Congratulations! Your organisation has recently partnered with a client who is looking to you and your team to undertake a new implementation project! Sales has sent through the signed contracts, your Project Manager has forecasted in your time and presented you with a project plan (with some optimistic timeframes) and your Director can’t keep stressing how important this client is (“this is going to be a really great case study!”). You’ve got everything you need to jump right into Production, spin off some dev sandboxes/scratch orgs, set up your repos, and get started on the build, right?
...Wrong! All we’ve got to work with are some discovery notes from the Sales, some high level build estimates, and a two month old recording of a demo from a Solution Engineer which, while informative, isn’t enough information to build a fully fleshed out solution.
This is where the magic of the workshop comes in. Workshopping is an integral part of any successful Salesforce implementation, and is an extremely important tool in every Solution Architect and Functional Consultant’s toolkit. Every project, no matter the size, should always start with a thorough Plan & Architect phase, where the project team runs a set of discovery workshops designed to capture as much information, which ultimately informs User Stories and everything else that you put in your Solution Design Document.
There’s no sugar coating it, workshops can be a daunting task for both us and the client. However, this doesn’t always have to be the case. When done well, workshops can be the most fun part of any implementation project, and workshop facilitation is an extremely useful and rewarding skill.
In this blog post, I want to break down some key concepts that I use when designing and facilitating workshops. I want to unpack: why we run workshops, facilitating workshops in a virtual world - including tools, structure, and activities, and some best practise tips and tricks that haven’t failed me yet. Whether you’re a brand new Consultant taking your first steps in the partner ecosystem or a seasoned SF Veteran, I hope that these concepts can help you design and facilitate fun, effective, and interactive workshops that you and your clients will love.
Why do we run workshops?
Before we dive into specifics, we need to understand what workshops are. Essentially, workshops are discovery meetings on steroids. They are interactions with clients over extended periods of time where the ultimate goal is to extract information, and use the information to build a solution. That’s it. It seems simple, but workshopping is so much more than just about extracting information.
Here are three key reasons to why you should always be running workshops:
Gather & Understand Information
The first reason, and the most obvious, is to gather and understand information about the client to build a solution. During workshops, we need to immerse ourselves in their business - their goals, strategies, challenges, people, and processes - to a point where we have an intimate understanding of who they are, what they’re doing, and why they’re doing it.
I will caveat this by saying: don’t expect to receive 100% of the information that you need for a full solution. Throughout the course of build, it is inevitable that there will be changes or adjustments to the solution. However, workshops should provide you with about 98% of the information you need to build the foundations of the solution which you can then iterate over the lifecycle of the project.
Establish Trust & Rapport
The second reason is to establish trust & rapport. More often than not, workshops will be the first time that the entire project team - the build team and client team - come together for an extended period of time. They will most likely be the longest meetings that the entire project team will have together over the course of the project. Workshopping is a really great place to set the tone for the project and establish a strong working relationship, cultivate an environment of openness and trust, and build a shared vision for the project from the get go.
Get Alignment
The final reason is to get alignment from the whole project team on what exactly is the ultimate goal for this project and what a successful solution looks like. If the build team and the client team are not aligned, then the project is doomed to fail. We need to ensure that everyone involved is on the exact same page at all times, and that we’re all working towards the same vision and objectives.
How do we facilitate virtual workshops?
Covid has really thrown a spanner in the works and catapulted us into a virtual office world. While I think we’ve gotten some neat things out of it, like remote working being widely accepted, it has dramatically changed how we do some things. We can’t run in-person workshops anymore (though that will soon change!) so in the meantime we’ve had to settle for virtual channels to run these activities.
The biggest key for running virtual workshops is Interactivity. Every workshop should have an element of interactivity where the client is collaborating on activities, creating mind maps, process flows, and having discussions amongst themselves. No one likes to sit in a meeting and just answer questions. By making your workshops interactive, you’re fostering an environment of fun, collaboration, and trust.
Here, I’ll break down tools, structure, and some activities I use when facilitating workshops.
Virtual Workshopping Tools
There are a couple non-negotiable things that you need to run great virtual workshops:
- A Video conferencing tool - Zoom/MS Teams/G-Meet/GoToMeeting etc.
This must have screen sharing and video capabilities. You can’t run a workshop without this. No, phone calls do not count.
- An online whiteboard tool - Miro/Mural etc. (we use Miro here at Mav3rik)
Whatever tool you pick must have the ability for your audience to log onto the board and interact with it, meaning they can write post-it notes, draw things, move some things around etc. No, pointing your camera at a physical whiteboard while you write post-its or screen sharing a Google doc and writing notes on absolutely does not count. Slide decks are highly encouraged but should not be the focal point of the workshop.
- A webcam and a working microphone
It’s really good practise to have your webcam on whenever you are speaking during a virtual workshop. If you are facilitating, then I think the webcam must be on. As a facilitator, the only times it’s ok to have your webcam off is during activities, during breaks, or if your video conferencing tool of choice doesn’t allow for simultaneous screen sharing and video. For everyone else in the meeting, webcam on is preferable but not necessary.
Sample Activities
The workshop activities that I use are very standard Design Thinking workshop activities. Service Designers, Business Analysts, Product Managers, and UX/UI Designers have been using these for years, and there’s no reason why Salesforce Consultants shouldn’t be able to. Yes, there are some extra things that we need to capture such as security requirements, hierarchies, and data volumes, but at the end of the day we’re designing and building a solution that is both a combined service and product.
Below are a few sample activities that I use during workshops to begin building up a solution:
Activity 1: The Vision Board
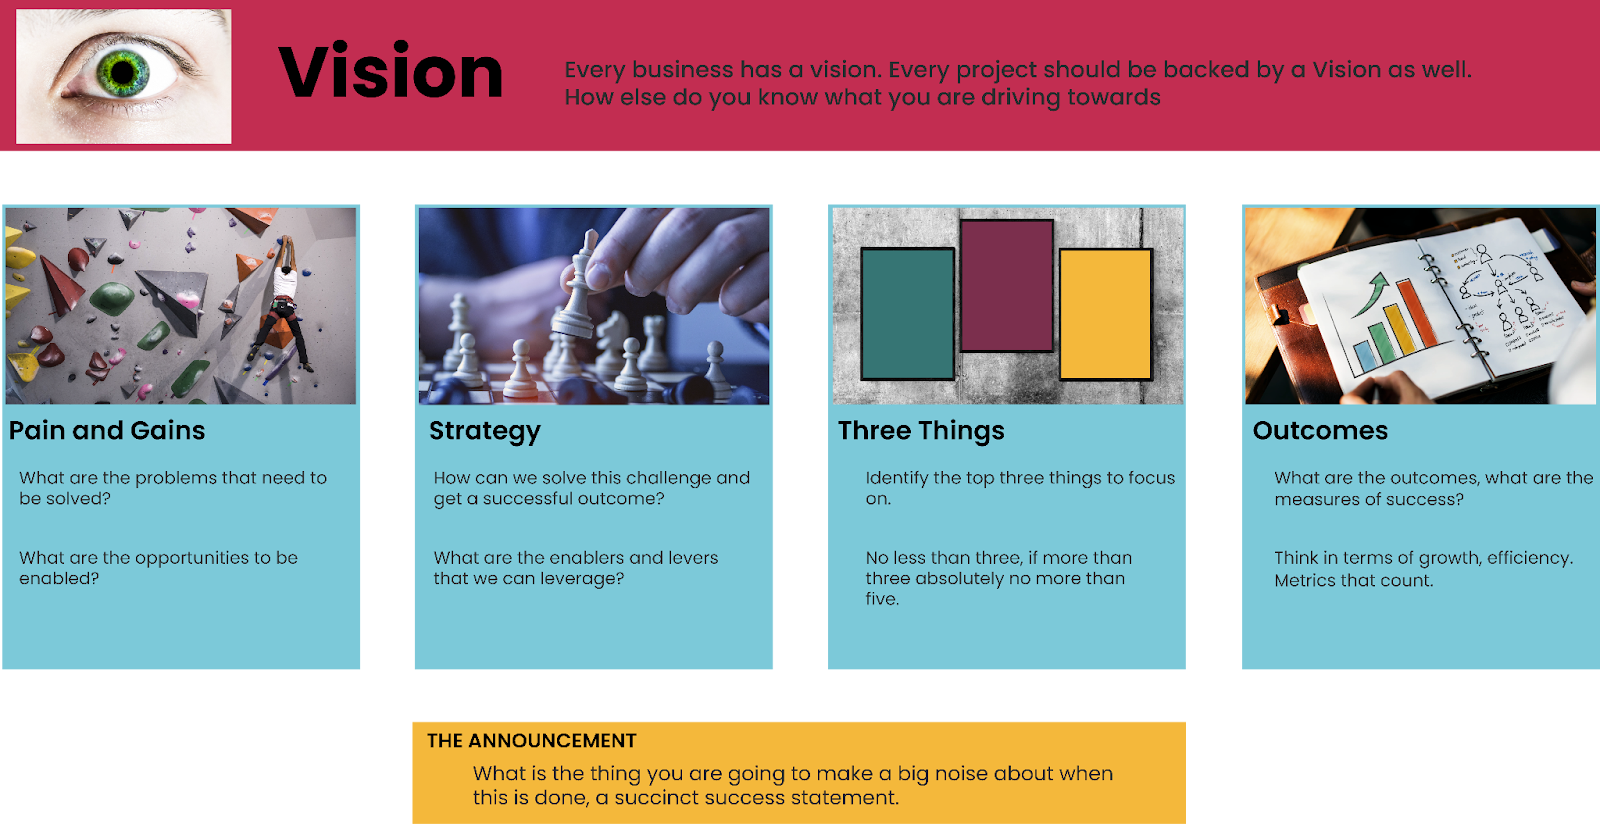
The purpose of the vision board is to lay the foundation for our understanding who our clients are and what they are looking to solve. It’s extremely important to get holistic context into our client’s business, as this acts as the groundwork for which we can begin building a solution for. We’re barely thinking about Salesforce here. At this stage, we just want to absorb as much information about the business as possible.
In this activity we look at five key items - Vision, Pains/Gain, Strategies, Focus Areas, and Outcomes. Initially, I run this activity as a high level business discovery. Afterwards, I like to couple this with a persona mapping conversation, where we discuss the users of the solution. From there, we repeat the Vision Board activity for each identified persona.
The core outcome of this activity is to fully understand what matters to the business and to each individual persona, and to align across the entire project team the goals and successful outcomes for the project.
Activity 2: The Process Map
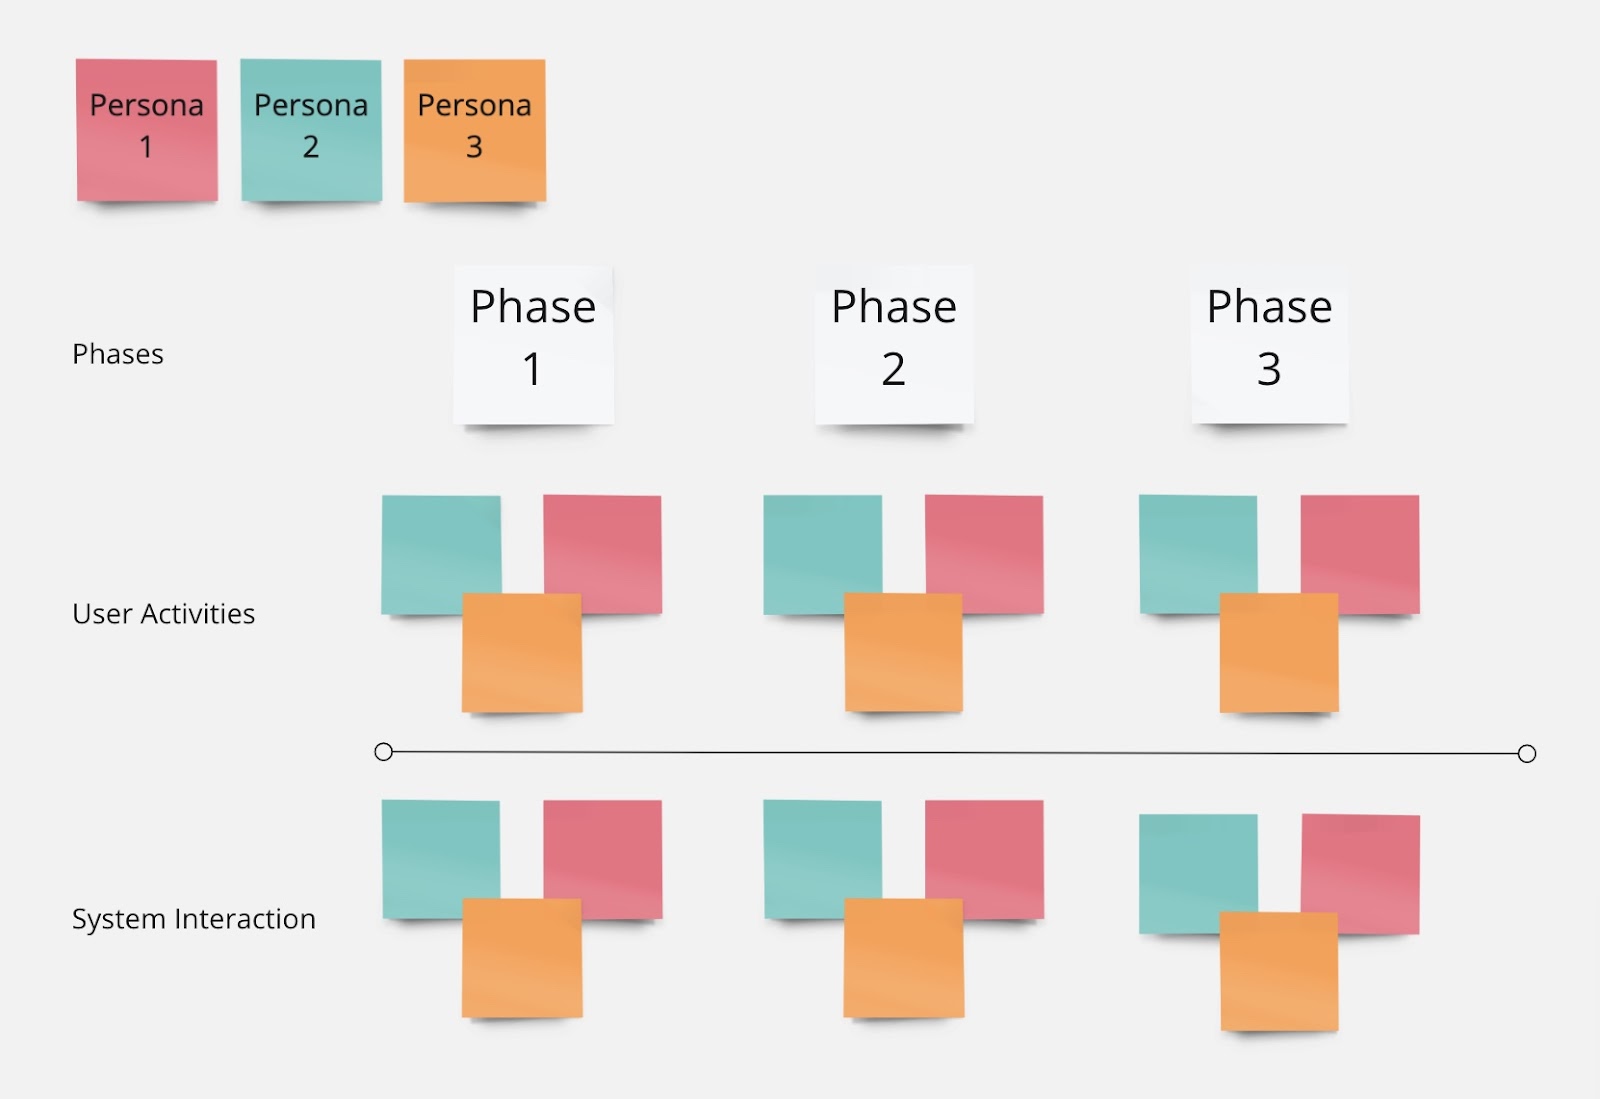
The Process Map is an activity used to understand specific processes within the client’s business that they are looking to improve using Salesforce. Every project should aim to understand what are the As-Is processes and the To-Be processes that the solution will be improving.
In this activity, look to chunk up each process that we are mapping out into phases or stages. From here, we want to understand what the user activities are per persona, the system interaction that is enabling the user to perform a specific activity, as well as the outcomes of a specific interaction - whether it be a report, some automation, a validation rule, etc. If you want to get specific, we can begin mapping out fields and field values in our system interaction section.
We repeat this activity for As-Is every process that needs to be mapped. For example, if we were doing a Sales Cloud implementation looking to transform a client’s end to end Sales process, we would create maps for the Lead Management process, Opportunity Management, Contract management, etc. We then repeat the activity for every To-Be process that needs to be mapped. In some cases, this could involve taking the already mapped As-Is process, and simply redoing the System Interactions to align with the new solution built on Salesforce.
The outcome of this activity is to get an understanding of the end-to-end process and sub-processes for the business, and get alignment from the project team about what needs to be improved and built. From this activity, we can infer the high level solution themes (otherwise known as epics) and functional areas that the client requires for this project.
Activity 3: User Story Mapping
User Story Mapping is an exercise where we take the specific Epics that we uncover as part of Vision Boarding or Process Mapping and break them up into the functional items that the solution will want to achieve.
In this activity, we get the client to begin thinking about functional areas for the solution build as they relate to Salesforce. These functional areas will end up becoming our User Stories, and clients can use this opportunity to begin discussing and defining each of these to provide a clear picture of what needs to be built.
Activity 4: MoSCoW Analysis

The final activity is known as a MoSCoW Analysis, and is a method by which we can ruthlessly prioritise the functional items captured in the User Story Mapping.
Here, we have the client take each of the functional areas and make decisions about what is a Must Have, a Should Have, a Could Have, and a Won’t Have. Everything in a Must Have is a functional requirement that absolutely needs to be in the solution for it to be considered successful. Everything in Won’t Have is either Out of Scope or can be pushed to a later phase. Should Have and Could Have can be used to determine the priority of which things get built, or what can be pushed out to later phases of the project.
From this activity, the entire project team should have a very clear alignment of what the Solution needs to do, and what we need to build to achieve it.
Structuring workshops
Virtual meeting fatigue is a very real and very challenging aspect of this new digital world, and one that we need to be super mindful of in every interaction we have.
For this reason alone, I strongly advocate that virtual workshops run for no longer than three to four hours maximum for a straight session, with 10-15 minute breaks every hour. Space out the workshops so you only have one a day, and only have two workshops in a single day if absolutely necessary.
The time you get back in your day should be focussed on digesting the information, writing the solution design document, and preparing for upcoming workshops. Clients will surely have a stack of other work that they need to complete.
When running workshops, I typically follow a standard structure:
Pre-Workshop
Send out all the pre-work and materials necessary prior to the workshop itself. This includes any pre-reading - for either the build team or the client, the agenda for the upcoming workshop, and setting up the virtual whiteboard in preparation for the day’s activities. The whiteboard should consist of three things: the activity itself, a workspace for each person to work in, and a Parking Lot for questions that need to be answered later.
Introductions, Agenda Setting, and Warm Up Exercises
In every workshop, agenda setting is important as it gives everyone a structure to the day and what to expect.
If it’s the first workshop, then a round of introductions is necessary to make sure that everyone familiarises themselves with each other. If someone new comes into the workshop, have them introduce themselves before diving into the activities for the day.
At this stage, share your screen, share the link to the virtual whiteboard board, and have everyone log in and have a play around. Explain to them how to use it - such as adding post it notes, dragging post it notes, etc. and then run a warm up exercise to get everyone in the groove. I like to have my audience draw an animal on a post it note and place it up in a “Petting Zoo”.
Activities
Now onto the fun part, the activities. Once your audience is warmed up, it’s time to launch into the bulk of the sessions - the discovery activities. The actual activities themselves may vary based on the type, but I always run my activities with the following structure:
- Introduce the Activity - what we’re doing, what is the purpose, how to do it (5 minutes)
- Do the Activity - have your audience complete the activity while facilitating and asking questions if necessary (30-60 minutes).
Take a break here if the activity ran for 60 minutes!
- Discuss the Activity - once your audience has completed the activity of if they run out of time, spend some time discussing what was done and going around the audience to explain what they wrote as part of the activity. (30-60 minutes)
- Close the Activity - summarise what was learnt and how it can be used for the solution. (5 minutes)
Rinse and repeat based on however many activities you have planned!
Workshop Conclusion and Expectation Setting
Your workshop is done, everyone is tired, but you’ve got a whiteboard full of colours and post-it notes from the day’s activities. Thank everyone for their time and set the agenda and expectations for the next workshop.
Post-work
If necessary, assign people some post-work such as questions to go away and research or processes to think about in greater detail.
Facilitation tips
Workshop Facilitation is an art form, and much like art, every individual will have their own unique style. However, much like art, there are some techniques that can be applied to enhance and improve your already amazing and unique style. Here are some tips that have helped me immensely:
The 80/20 rule
As consultants, we are here to be curious and learn everything we possibly can about our client’s business. Clients should be engaged in activities/discussing things for 80% of the time. Facilitators and other build team members should be asking questions or sharing knowledge 20% of the time. We can’t listen and learn if we’re speaking!
If you’re on the more introverted side, this rule also helps reinforce the idea that in a workshop, we just want to listen and learn. Essentially, we’re listening to the client present something back to us and we’re just guiding them along the way. We don’t get nervous when we’re in the audience at a speech, how is this any different?
Timebox everything
Keeping things timeboxed provides a really great structure for the workshop and keeps everyone on the same page. By adding time limits to activities, you’re pushing everyone to get as much down as they can, which often leads to some great findings. Of course, this can be flexible, but it’s a great thing to at least set an expectation at the start. For example, saying things like: “We’ll have 45 minutes for this activity” or “Do we need another 10 minutes for discussion?” all goes a long way in setting expectations.
Assigning Team Roles
Let’s face it, you can’t do everything yourself. You also shouldn’t ever run workshops by yourself. I recommend at minimum, having at least 1 or 2 other members of the team with you while you facilitate. You should have at the least the following three roles assigned:
Facilitator - someone who leads and runs the workshop(s)
Drivers - people on the virtual board tidying it up during an activity/after an activity. This includes resizing and moving post-its, creating larger working areas etc.
Scribes - people taking notes and scribing the workshop. Things get brought up in discussion that don’t get noted down on the board, so it’s important to capture this just in case we need it.
These roles are interchangeable as you go - you can be a Facilitator in one workshop and a Driver in the next, it’s all dependent on your team.
Call out EVERYONE in the room at least once
It’s inevitable that you will get some awkward silence in a workshop. Calling people out by name is the key to ensuring that everyone is engaged during the workshop. When I say call out, I don’t mean in an expository way, I mean in the sense of calling upon certain members of the audience who might not have spoken or shared an opinion, and asking them a question.
For example if you’re running a Process Mapping activity, prompting someone like “Hey Tom, what do you think about this interaction here - how do you think it could be better?”.
Engaging with everyone makes people feel heard, and we want to always be fostering a space where people can be open about their ideas and thoughts without any judgement.
Closing Words
If you’ve made it this far, thank you for giving this a read! Workshops are the most exciting and fun part of any Implementation project. You’re immersing yourself in your clients business and learning the inner workings of what they do. You’re understanding their pain points and designing something that will help them immensely. They’re a fun, interactive way to build strong working relationships, and facilitating is an extremely important skill to have for anyone in Salesforce consulting.
Here at Mav3rik, we’re going through a huge growth spurt and would love to bring on board some client focussed Consultants into our team. If you’re interested in learning more about us or want to apply, please reach out to our Head of People Services Leila Enojas on 0434 079 699 or leila.enojas@mav3rik.com.

Like the sound of being a Mav3rik?
From Salesforce training accreditations to quarterly health benefits for wellness expenses, we are, quite literally, a certified Great Place to Work. What are you waiting for? Get in touch and join the team.
See available positions